Add DMARC record to DNS
What is a DMARC record and how do I add DMARC to my DNS. A DMARC record contains important instructions on how messages that fail email authentication should be handled by mailing servers.
In this article, we’ll use examples to explain what a DMARC record is and show you how to add a DMARC record to your DNS.
Are you ready? Then let’s start!
What is a DMARC record?
A DMARC record is a TXT record that contains instructions on how an email server should handle an email that fails to authenticate. DMARC (Domain-based Message Authentication, Reporting and Conformance) is designed to reduce email abuse. DMARC records allow you to control whether email recipients should reject, quarantine, or not handle a suspicious email.
How does DMARC work?
DMARC leverages two existing email authentication protocols (SPF & DKIM) to help email recipients determine the authenticity of a message and decide whether to deliver the message to the inbox or move it to a quarantine or spam folder, according to the guidelines set by the sender.
It’s important to create a DMARC record because it helps servers distinguish legitimate emails from fake ones. This minimizes cyber threats such as phishing, email spoofing, and CEO fraud. That’s why you should create a DMARC record to ensure better email security.
DMARC – Policies and Parameters
A typical DMARC record contains at least three important components (or tag-value pairs). Here’s an example of a DMARC record:
v=DMARC1; p=reject; rua=mailto:contact@joewp.comHere we have three tags: v, p, and rua with values DMARC1, reject, and mailto: contact@joewp.com.
The v tag indicates the version of DMARC, the p tag is the policy (or the action to take if emails fail DMARC checks), and the rua tag is the email address where you want to receive aggregated DMARC reports.
In our example, the p tag has the value “reject”. The policy here defines a rejection when authentication of a message fails.
DMARC – Guidelines
There are three different DMARC policies
none – no measures
quarantine – treat the e-mail in question as suspicious and e.g. mark it accordingly or move it to the spam folder
reject – reject the email in question
DMARC – Optional Parameters
Optional parameters you can use:
sp = policy for the subdomains
pct = the percentage of email messages to which the DMARC policy should be applied, default is 100 percent
rua = comma-separated list of e-mail addresses to which the overall report should be sent
ri = max. Interval in seconds, which may exist between the sending of the individual total reports, default is “86400” seconds = 24 hours
ruf = comma-separated list of email addresses to send a detailed report of the email messages that failed DMARC evaluation
rf = format for detailed report, default and currently only supported format is “afrf”
fo = detailed report options, options are “0”, “1”, “d” and “s”, several options are separated by colon,
e.g. “fo=0:s”, default is “fo=0”
fo=0 – a report is generated when SPF and DKIM are violated
fo=1 – a report is generated if SPF or DKIM is violated
fo=d – a report is generated if DKIM is violated
fo=s – a report is generated when SPF is violated
adkim = matching mode DKIM, default is “r”
s (strict mode) – domain from DKIM signature and the domain from the FROM email header must match
r (relaxed mode) – a subdomain can also be used
aspf = matching mode SPF, default is “r”
s (strict mode) – Domains from the FROM of the email header and the so-called SMTP envelope must match
r (relaxed mode) – a subdomain can also be used
Using Mail SMTP
If you’re using WP Mail SMTP to process your WordPress emails, you’ll be notified if DMARC isn’t properly configured in your domain. You may also see an error like “No DMARC record found.”
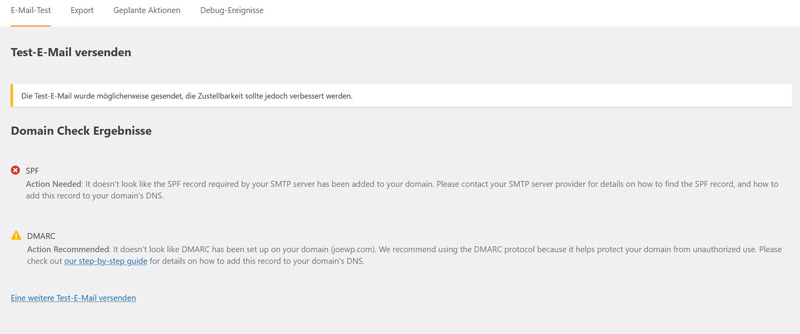
The following steps will help you solve the problem.
How to create a DMARC record
Let’s walk through the step-by-step process of setting up a DMARC record on your domain. We’ll show you how to create a generic dataset that works with any host.
Check your DNA with a DMARC analyzer
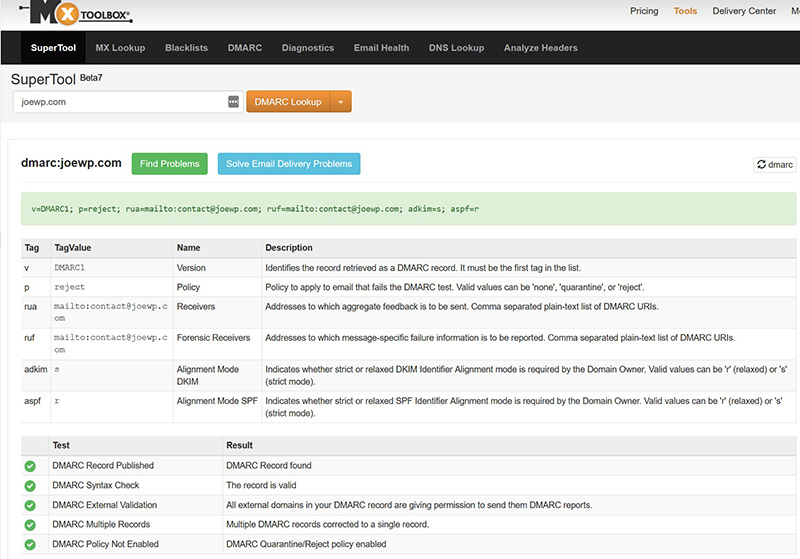
If you’re not sure if you’ve set up a DMARC TXT record on your website, you can use a DMARC checker like MXToolbox. This allows you to scan your DNS records.
https://mxtoolbox.com/SuperTool.aspx?
Enter your domain name in the input field and click on the DMARC Lookup button.

Create your new DMARC TXT record
In this section, we’ll show you how to copy and paste a DMARC record that works with any host.
Using our example, it’s easy to add a DMARC record manually.
A DMARC record is a TXT record that starts with: “_dmarc.” so in type Option TXT.
In the Name field, look for “_dmarc.” with a dot (dot) at the end. However, some hosts don’t need the point. In that case, you can simply remove it if you see an error. In this case, you use: “_dmarces” without the period.
For example, in the large field in the DNS record, enter this DMARC record:
v=DMARC1; p=none; fo=1; rua=mailto:me@example.comHere’s what this rule does:
We use p=none because it’s the least restrictive setting. You’ll still receive email reports if there’s an issue with your DNS, but it’s unlikely that the delivery of your own mail will be impacted. If you receive suspicious DMARC reports, you can change this part of the rule to p=quarantine.
Be sure to change the “rua=mailto:me@example.com” part with your email address.
If the authentication method (DKIM or SPF) is not aligned with your DMARC record, the fo=1 rule will be generated with a Forensic Reports with details of the event.
Basically, the TTL (Time to Live) setting is like an expiration date for your DNS. We recommend setting this setting to Auto, which is usually 4 hours. The setting is not decisive and can be set individually to another value, e.g. 24 hours or 14400.
Certain vendors may ask for a targeting rule. However, you can rule them out without hesitation. It’s not a criterion for your DMARC text record to work.
On our website joewp.com, our finished DMARC record is as follows:
v=DMARC1; p=reject; rua=mailto:contact@joewp.com; ruf=mailto:contact@joewp.com; adkim=s; aspf=rHow long does it take for the DMARC record to be active
It usually takes some time for your DMARC record to propagate
If you make changes to your website’s DNS, it can take up to 48 hours for the changes to take effect.
Function check of your DMARC record
You can then use a web-based DMARC checker like MXToolbox to check if the records have been applied correctly.
The DMARC rule should appear in a green bar. This will show you that the rules work.
Check of Mail SMTP in WordPress
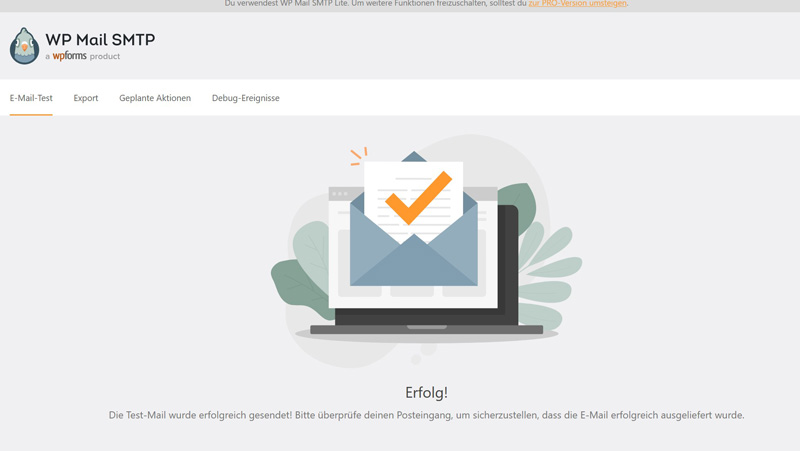
Then you can check in the WordPress dashboard under “WP Mail SMTP” (WP Forms) whether the settings are correct and the sending of the mails works perfectly. Simply send a test email to one of your email addresses. If everything goes right, you will get the message “Success! The test mail has been sent successfully! Please check your inbox to make sure the email has been delivered successfully.” as shown in the screenshot below.
DMARC and SPF + DKIM record with the provider all-inkl.com
If you’re maintaining your website with the domain host “all-inkl.com”, follow these steps:
To set up DMARC, you’ll need an SPF and DKIM record beforehand.
Create SPF record at all-inkl.com
Here’s a guide on how to create an SPF record on all-inkl.com: https://all-inkl.com/wichtig/anleitungen/kas/tools/dns-werkzeuge/spf_482.html
Create a DKIM entry for all-inkl.com
The following instructions explain how to create a DKIM record: https://all-inkl.com/wichtig/anleitungen/kas/tools/dns-werkzeuge/dkim-bei-versand-ueber-unsere-mailserver_541.html
Create a DMARC record at all-inkl.com
With DMARC, you can provide recommendations on how a recipient server should handle an email in case of SPF and DKIM violations. You also have the option of being informed in the event of violations.
Step 1
All e-mails sent via mailboxes of your KAS (technical administration) are digitally signed and can be checked for authenticity by a receiving mail server. A DKIM key is stored in the name server at all-inkl.com. DKIM signing of an email can only ensure that an email arrives at a recipient in an unchanged form. There is no evaluation regarding spam.
Step 2
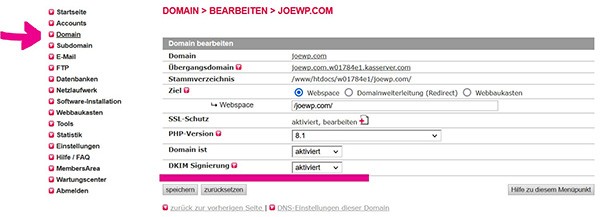
To activate DKIM for your domain, click on Domain in the KAS (technical administration) and edit your domain there.
Step 3
For DKIM signing, set the selection to “enabled” and save the change.
Step 4
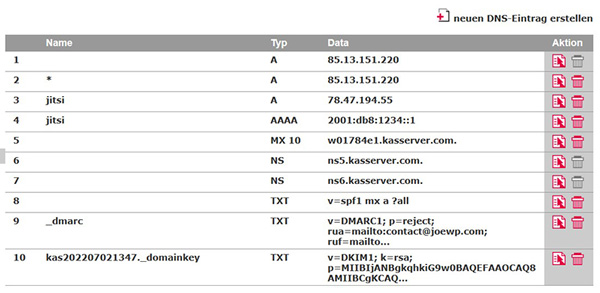
In the KAS (technical administration) under Tools -> DNS Settings you will find an entry similar to the one in the image above.
Conclusion
With DMARC, you can block malware and phishing attacks and improve the deliverability of your emails. Once you’ve enabled it, a DMARC record ensures that only authorized senders are authorized to send messages.
Recipients can thus immediately recognize who the email really comes from. This way you can be sure that your domain is not being used illegally for spam or phishing.

