WordPress User’s Guide to What is FTP
Many WordPress users are familiar with the administration of WordPress, but do not know how to upload files to WordPress via FTP or edit them on the server. So what is FTP? We just want to explain it to you in 4 steps.
You can perform many tasks from your WordPress dashboard, but there are a number of cases where you need to connect directly to your web storage or server. This is the case if, for example, you need to make changes directly to one of your website’s files, e.g. B. to add code or adjust user permissions. For any task that requires you to edit, transfer, or amend your WordPress files, this is done via the File Transfer Protocol (FTP).
FTP allows you to connect directly to the files on your web space where your WordPress site is stored. There you can then edit, add and delete information and code directly. You don’t need to use the WordPress dashboard in this case.
In our guide, we show you how to use FileZilla FTP tool to access your WordPress files.
Are you ready? Then let’s start!
What is FTP (and why is it important)?
File Transfer Protocol (FTP) is a way of transferring information between a server and a client. Your website’s files are stored on your web host’s server. You can manage them via FTP to access these files from your computer.
There are many reasons you might want to access your site this way. You can use FTP to:
- Install plugins and themes directly (if you have problems with the uploader in the WordPress dashboard).
- Change files within plugins and themes. This comes in handy for advanced customization, especially if you want to access functions within individual files like functions.php or header.php in your theme.
- Manually disable plugins and themes to lock them out of your WordPress dashboard (e.g. faulty plugins).
- Upload media files to the server one by one or in bulk, e.g. if the WordPress dashboard is uploading media too slowly.
- Manage WordPress core files such as the .htaccess file (adjustments to the login page, take security measures, set up caching settings or redirects).
- Diagnostic work and troubleshooting and bug fixes on your website (e.g. compatibility issues, internal server errors and design conflicts).
While some things can be done directly from the WordPress dashboard, there are some important reasons to use FTP. This includes accessing your site files when they are unavailable. This applies in particular to plugin conflicts and the website being infected by malware or website crashes. You can still access your site via FTP if you have an issue with your WordPress login page and it becomes unreachable or blocked. Learning FTP for all webmasters and WordPress users is essential for these reasons.
So read on to learn all about what is FTP and the tools.
The FTP client FileZilla: your primary tool when dealing with FTP
To use FTP, you need a so-called “FTP client”. This is a program that allows you to connect to your server, because that’s where all the files on your website are stored.
We recommend using the “FileZilla” tool as FTP client. It’s free and easy to use. It is also recommended by WordPress. In addition, it is open source. The FileZilla developers provide useful documentation to get you started.
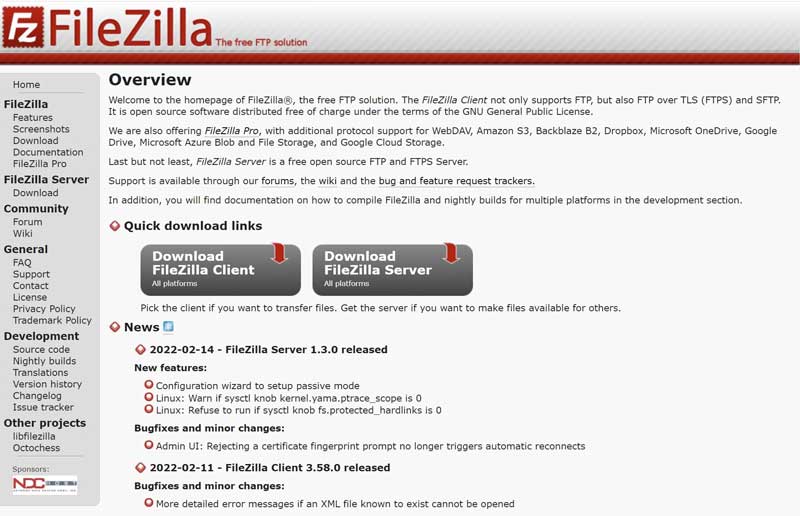
In our guide, we use FileZilla to explain the functionality of a client to you. You also have the option of using various other clients, here is a small selection:
Once you’ve downloaded the FTP client to your computer, you can use the file transfer protocol to make simple changes to your website files.
We’ll show you how it works in four easy steps.
How to use FTP to access your WordPress site
We use FileZilla for this tutorial. If you’ve decided to use another tool, don’t worry. The steps are similar no matter what FTP client you use.
Step 1: Back up files
Before you start working with the FTP client and making changes to the folders or files, it is important to understand the risks of using FTP. With FTP modifications, you make permanent changes directly to your site’s files. Errors can lead to significant problems up to and including the failure of your website. This is why it is important to have an up-to-date website backup. If something unexpectedly goes wrong, you can use your backup to restore the website.
You should back up the following parts of your website:
- The WordPress core files
- The wp-content folder with all your media, plugins and themes
- Your WordPress database
Here are some backup plugins that we can recommend:
The backup plugins allow you to back up your website files and database to your computer or cloud storage. This enables you to get your website working again in the event of problems.
Step 2: Install FileZilla
After backing up your website, install FileZilla on your computer. Visit the FileZilla website and use the download for your operating system.
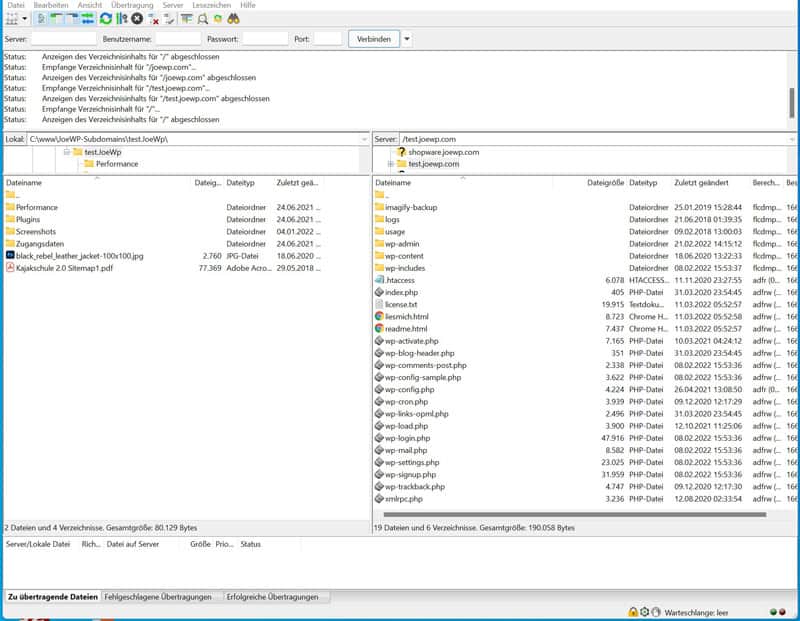
After installing the program, you can open the tool on your computer. FileZilla opens a view in two split pages:
- The local files (all files on your computer).
- The server files (the website files stored on your server).
You can edit, transfer, add, and delete files by right-clicking files or by dragging and dropping them to appropriate locations.
Step 3: Connect to the host server via FTPStep 3: Connect to the host server via FTP
Upon opening FileZilla, you can see that the remote site (right side) is not connected to a server and this field is blank. All your website files are stored on the server. In order for this data to be visible and you can edit it, a connection to the server must be established.
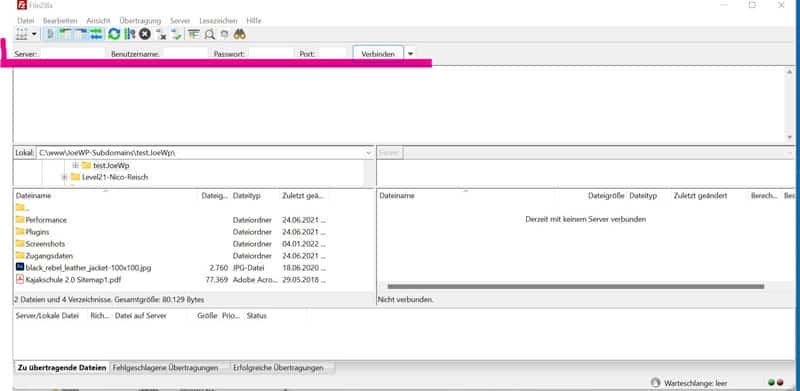
You’ll see four blank fields to fill in at the top: server, username, password, and port. These are the FTP access data for your hosting, which you receive from your web host / provider.
In order to be able to establish a connection to the server via FTP, you need the following data:
- The FTP address of the web host/server
- Your FTP username
- Your FTP password
- The port used by your host for FTP
How do I get the FTP credentials
You will receive all of the above information from your hosting provider. To do this, you must log into your hosting account or customer control center of your hoster / provider. There you will find the login information in your personal account information. If you can’t find it right away, just check your hosting account’s documentation or help pages.
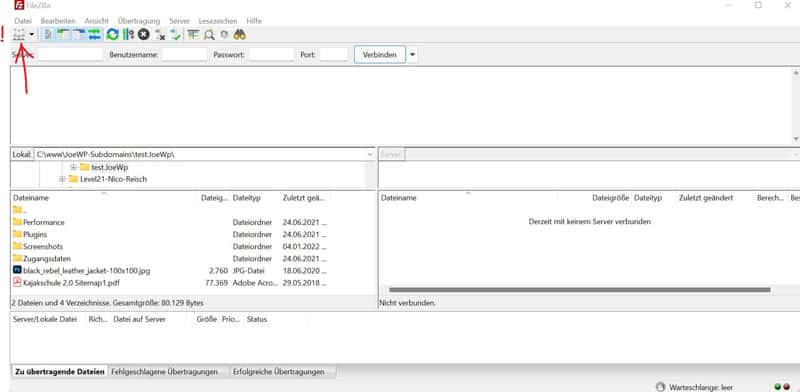
If your host requires a connection via “SFTP”, you must log on to the server using the FileZilla server manager. To do this, click the Server Manager button in the top left corner of FileZilla (see image above). This opens another window for entering the login data (image below).
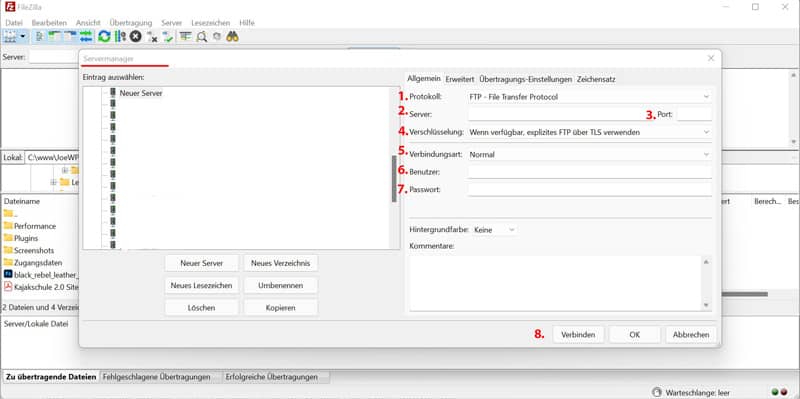
In the right pane of the window, paste the credentials you received from your host:
- Protocol: (select here: SFTP)
- Server: your server name
- Port: your server port (usually can be left blank if nothing is explicitly specified by your host)
- Encryption: (if available, connect explicit FTP over TSL)
- Connection Type: Normal
- User: your FTP username
- Password: your FTP password
- After all fields are filled out, click on the “Connect” button.
Note: If you do not want to re-enter your login information every time you connect, you can alternatively save it for the next login. To do this, create a “New Server” in the Site Manager area (left side of the login window) (to which you can give your own name) and, after entering the login data, click on the right side (as before) in the lower right corner Page on “OK” before you connect. This will save your login details in FileZilla. The next time FileZilla is called up, your data will be automatically inserted and you only need to connect with a click.
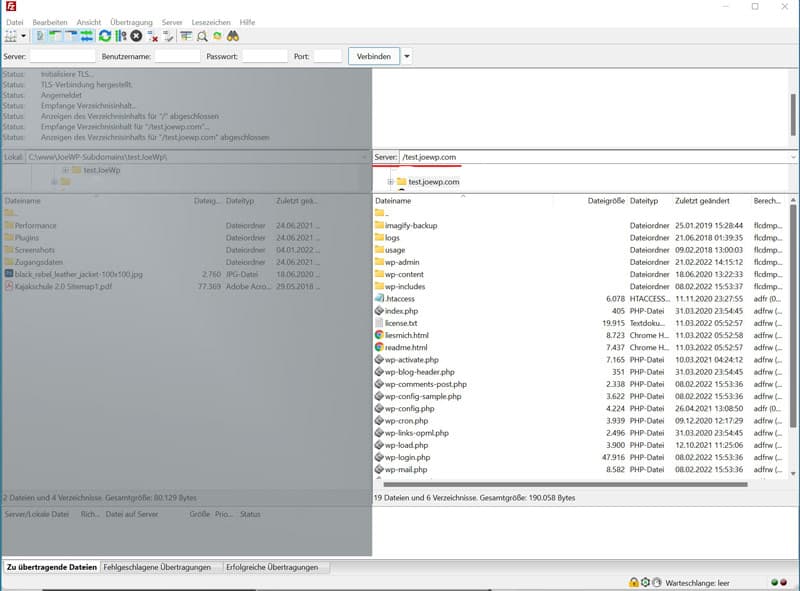
After connecting to your server, the status log will say “Successful”. The contents of your website files will then appear in the Server window on the right.
Step 4: Manage the WordPress files
Once FileZilla is connected to your server, you can see files and folders in the following locations.
The location on the left shows the files on your local computer.
The location on the right shows your site’s files (on the server).
You can drag and drop files between the two storage locations.

The root level of your server is located in the upper right area (point 1 in the image). From there, look for the folder under which your website’s domain can be found (can also be called public_html or www). All of your website data is stored in this folder.
Open this folder with a click and then all folders with your website files on this level will be displayed in the folder area below (point 2.).
The “wp-content” folder contains subfolders for your themes and plugins. Clicking on this folder opens the subfolders. Here you can make appropriate changes. You can also download folders or files from the right server area to the left area on your computer by dragging and dropping them. You can also make a full backup of the website this way. Note, however, that this is not a full backup of your WordPress site. All your content is stored in a database. For a complete backup, this DB must also be backed up.
Right-clicking on a file displays the following options:
- Download file to your computer
- Add files to the queue
- Delete file from your server
- Rename file
- Customize file permissions
- Create a new directory or file
Conclusion
An experienced WordPress user should know how WordPress works at the server level. FTP is the right tool for this. It allows to work directly with the files that make up the WordPress site. You now know how to answer the question “What is FTP” and can easily access your website via FTP. It’s a crucial skill that will help you manage your WordPress site more effectively.

